DIY Dog Food Station: Step-by-Step Guide to Building a Stylish Feeding Area
Turn Mealtime into a Tidy and Stylish Experience!
If you’re anything like me, you know how frustrating it is to see dog food scattered everywhere and bowls constantly out of place. I wanted a cleaner, more organized solution that also looked great in my home. That’s when I decided to build a DIY dog food station—and trust me, it was a game-changer!
Not only does this setup keep everything in one place, but it also blends seamlessly into my decor. Whether you want a built-in pet feeding area or a standalone station with storage, I’ll walk you through how to create the perfect setup for your pup.
Why I Built a DIY Dog Feeding Station (And Why You Should Too!)
At first, I thought, “Why not just keep using regular dog bowls?” But after constantly cleaning up spills and searching for dog food bags, I knew there had to be a better way.
Here’s why this project is worth it:
- Less Mess, Less Stress – No more food and water all over the floor!
- Everything in One Place – Store kibble, treats, and pet supplies in a single station.
- Saves Space – A custom design means no wasted space.
- Easier Mealtime for My Dog – Raised bowls make eating more comfortable for large breeds and senior dogs.
- Stylish and Functional – I made mine match my home decor, and you can too!
Choosing the Right DIY Dog Feeding Station
Depending on your space and style, here are some great options:
- Standalone Feeding Station – Repurpose an old nightstand, dresser, or cabinet (like I did!)
- Built-In Feeding Area – Integrate it into your kitchen island or cabinets for a seamless look.
- Fold-Out or Wall-Mounted Station – Ideal for small homes or apartments.
- Simple Elevated Bowl Stand – Perfect if you want a minimalist design without storage.
I went with a repurposed nightstand because I already had one, and it was the perfect size for my pup. Let’s dive into how you can do it too!
What You’ll Need
Materials:
- An old nightstand, dresser, or cabinet
- Drawer slides (for a pull-out feeding tray)
- Plywood (for making the tray base)
- L-brackets & screws (for extra stability)
- Vinyl wrap or paint (to match your decor)
- Drawer handles (optional, if replacing old ones)
- Epoxy or wood glue (for securing parts)
Tools:
- Screwdriver or power drill
- Sanding paper or sponge
- Heat gun or hairdryer (for applying vinyl smoothly)
- X-Acto knife or saw (for cutting wood if needed)
Tutorial Video
Step-by-Step: How I Built My Dog Feeding Station
I followed the process from the embedded Tutorial video and made a few adjustments to fit my dog’s needs. Here’s how you can do the same:
Step 1: Choose & Prep Your Base
I found an old nightstand that I almost threw out, but instead, I gave it new life as a feeding station.
- Remove all drawer pulls and hardware.
- Fix any wobbly parts and sand the surface before painting or adding vinyl.
Step 2: Remove the Bottom Drawer & Convert It into a Feeding Tray
- Take out the bottom drawer—this will be turned into a sliding tray.
- Cut a plywood sheet to fit the space.
- Optional: Cut holes for food and water bowls to keep them in place.
- Attach side supports using L-brackets to prevent the bowls from moving.
I skipped cutting the holes because I wanted the flexibility to change bowl sizes later.
Step 3: Install Drawer Slides for a Smooth Pull-Out Feature
- Attach drawer slides where the bottom drawer used to be.
- Make sure they are level so the feeding tray glides in and out smoothly.
Step 4: Create a Storage Space in the Top Section
- Use the top drawer or cabinet area for storing food, leashes, and treats.
- Add dividers or small storage bins to keep everything organized.
I love having a designated spot for my dog’s essentials—it makes daily routines so much easier!
Step 5: Customize the Look
- Apply vinyl wrap or paint for a polished finish.
- Use a heat gun or hairdryer to smooth out vinyl edges.
- Replace old drawer handles with new ones for a fresh look.
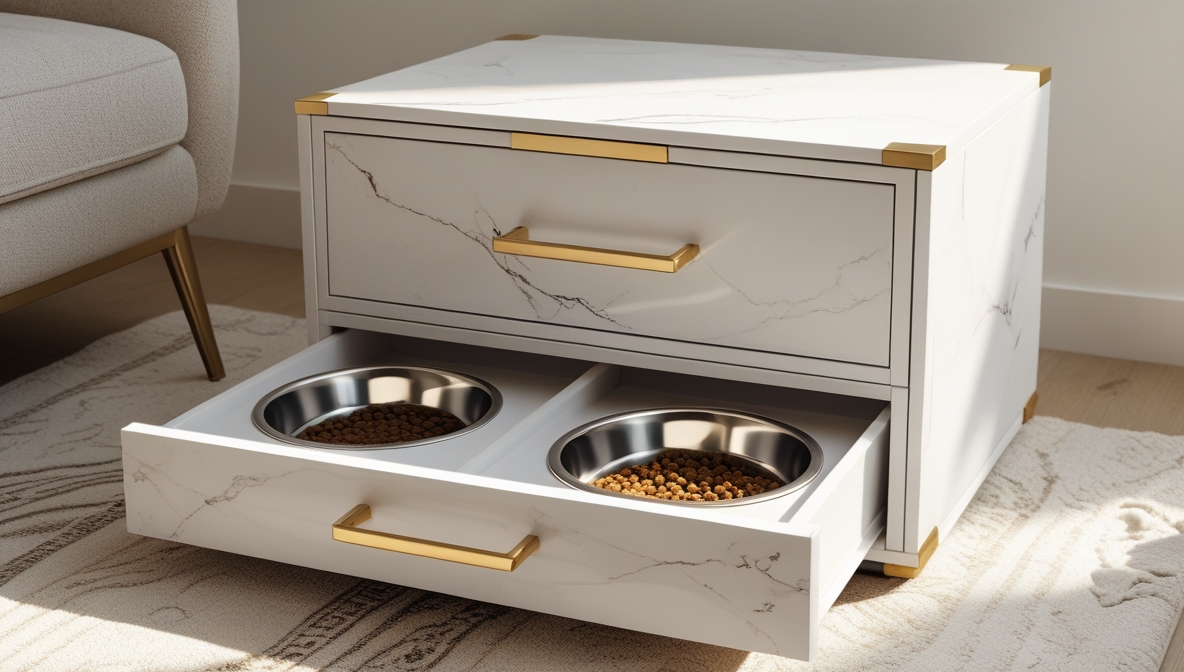
I went with a marble vinyl wrap for a sleek, modern touch. It looks way more expensive than it actually was!
Step 6: Attach the Front Panel to the Feeding Tray
- Secure the front panel to the pull-out tray using epoxy and L-brackets.
- Make sure everything looks neat and functions properly.
Step 7: Test & Final Adjustments
- Slide the feeding tray in and out to check for smooth operation.
- Ensure storage compartments are easy to access.
- Let your dog try it out and make any adjustments if needed!
When my dog first used it, I realized I needed non-slip mats under the bowls. Quick fix, and now it’s perfect!
Make It Your Own: Customization Ideas
Now that your feeding station is built, let’s add some personality!
- Personalized Nameplate – Add your dog’s name for a special touch.
- Matching Home Decor – Paint or stain the wood to fit your aesthetic.
- Extra Storage Compartments – Keep food, treats, and accessories in one spot.
- Foldable Design – A retractable tray is great for saving space.
FAQs: Everything You Need to Know
How Tall Should My Dog’s Feeding Station Be?
- Small dogs: 2-6 inches off the ground
- Medium dogs: 7-14 inches
- Large dogs: 15+ inches
Should I Cut Holes for the Bowls?
- If your dog pushes their bowls around, holes can keep them stable.
- If you want flexibility, skip the holes and use a raised edge instead.
How Do I Keep the Feeding Area Clean?
- Use removable silicone mats for easy cleanup.
- Store food in sealed containers to prevent spills.
Final Thoughts – Upgrade Your Dog’s Mealtime in Style!
Building a DIY dog food station completely changed how I manage my pup’s feeding area. It’s cleaner, more organized, and blends beautifully into my home.
Whether you go for a built-in feeding area or a standalone storage unit, this DIY project is fun, practical, and fully customizable.
Try it out, and let me know how it turns out! And don’t forget to watch the embedded video for a detailed walkthrough.